Have you ever heard of the process called anthotyping? Anthotyping, sometimes also referred to as nature printing or ecoprinting, is made by exposing a light sensitive material like paper or fabric to create a positive image. One way this is done is by placing plants on the light sensitive material then exposing it to the sun and then treating it to further develop the image. My favorite way to create this process is by using turmeric.
Materials
- Turmeric
- 70% isopropyl alcohol
- Coffee filter
- jar/cup
- Watercolor paper or cardstock
- Empty picture frame glass or clear acrylic sheet
- Paint brush
- leaves or flowers
- Borax
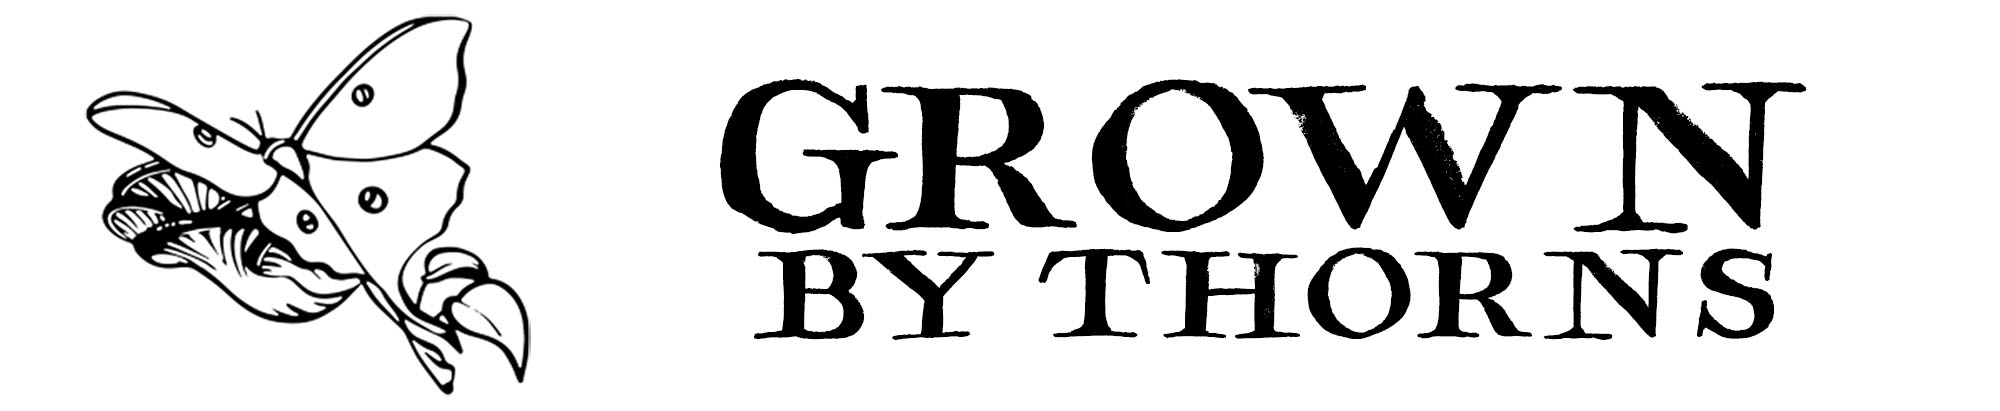
Coffee filter and brush used for anthotype emulsion application.
The Process
The first step of making your own anthotype is to create an emulsion to help make your material light sensitive. This is done by mixing rubbing alcohol with your pigment, in this case turmeric. I like to use a coffee filter for this to keep the spice grains from getting into the solution. You can mix your rubbing alcohol and turmeric together directly, but it will make your print dusty and it can be both a mess and frustrating to clean-up. To avoid this, set up your coffee filter in a jar or cup. Pour a few tablespoons of turmeric inside of your filter. Then, pour your rubbing alcohol directly over the turmeric into the coffee filter, so that it filters through the turmeric and drips into your jar or cup. The ratio of rubbing alcohol to turmeric isn’t as important here but the more rubbing alcohol you add, the more of the photosensitive solution you will have.
When you have filtered the turmeric and rubbing alcohol solution it will be a very bright, canary yellow color. This solution can now be applied to what you would like to print your anthotype on. I recommend a watercolor or mixed media art paper, these materials will be easier to saturate with your solution without having to worry about the paper falling apart. However, card stock will work better than standard printer paper if yo

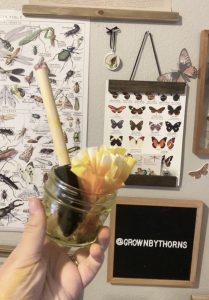
Turmeric anthotypes before sunlight with pressed flowers.
u do not have any art papers. Using a paint brush, evenly cover the space you would like your print with the solution and set aside to dry away from any direct sunlight.
After your material has dried with the solution on it you can set-up the anthotype print using your leaves and flowers. This works with both pressed plants and fresher plants. When you have a design made from your plants laid out over the solution treated space on your material you are ready to expose it to the sun. To protect your design from being blown away by any wind outside, place your empty frame’s glass directly over your design. This helps to weigh your design in place and protect it from the wind. For larger designs I use a big piece of clear acrylic instead of a picture frame’s glass. Once your design is secure with your glass or acrylic sheet, place it outside in an area of direct sunlight. Depending on how sunny it is, this process may take an hour or so. You know that your print is ready for the final step when the areas not covered by your leaves/flowers have lightened from the canary yellow color to a near white shade.
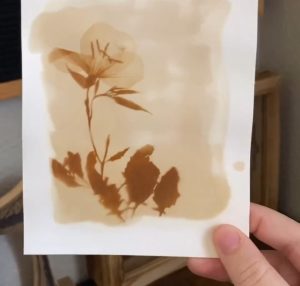
Anthotype after it has been developed with borax-water solution and left to dry.
Once the exposed parts of your solution have turned near white, remove the plants you have placed on it. Under where your design was placed, you should see that the original bright yellow color still remains. The final step in this process will further develop the details of your print. To make the developer you will need another cup, borax, and water. In your cup, add around two to three tablespoons of borax and mix it until it has dissolved a bit. The water solution will look a bit milky. Pour this solution over your print, ensuring any bright yellow parts are rinsed with the borax solution. You will know the process is working when the yellow parts turn to a darker brown. This will typically happen as soon as the borax water makes contact. Once the material of your print has been fully treated with the borax water, set your print to dry out of direct light. Once dried, you will have your very own anthotype! However be aware that the image is not permanently fixed and will still have some light sensitivity. It is best to keep them out of direct light.
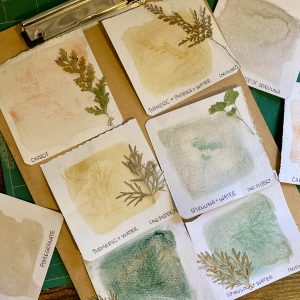
Experimental anthotypes using other natural pigments.
Explore More
If you liked this process you can try it with other pigments too, not just turmeric. I have tried this process with spirulina (algae powder), carrot juice, coffee, other spices, and more. This process can also make anthotypes with materials other than plants like old film, bugs, and transparencies to name a few.
You can watch a short form video of my anthotype process here. I share my experiments with eco-dye and other projects on instagram as @grownbythorns https://www.instagram.com/grownbythorns/ follow along to see videos of projects like this, developing photography with plants, and raising moths and butterflies.
I first shared this how-to on anthotype printing in the Central Texas Master Naturalist newsletter for October 2024.
